
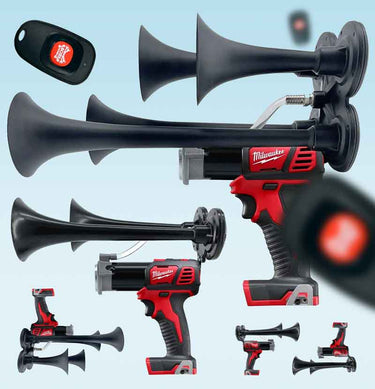
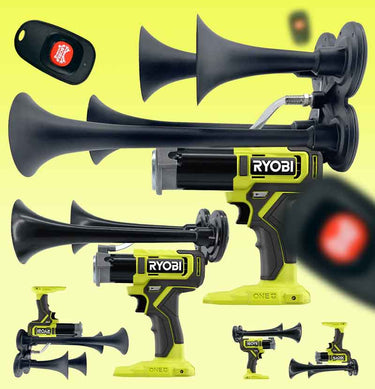
Did you know that air horn kits have been used in vehicles since the early 20th century to produce loud, attention-grabbing sounds for safety and communication purposes? The use of air horns has become increasingly popular in recent years, especially among truck drivers and car enthusiasts looking to customize their vehicles. With the rise in demand for air horns, the need for clear and detailed installation instructions has also grown. Many individuals who purchase air horn kits often struggle with understanding how to properly install them in their vehicles. This has led to the development of installation diagrams, which provide step-by-step visual guidance on how to connect the various components of an air horn system. By following an installation diagram, users can easily understand the wiring and placement of components such as the compressor, air tank, solenoid valve, and horns. This visual aid helps to simplify the installation process and ensure that the air horn system functions correctly once installed. In fact, studies have shown that users who follow a detailed installation diagram are more likely to successfully install their air horns without encountering any issues. Whether you are a seasoned DIY enthusiast or a first-time air horn user, having access to an installation diagram can make the installation process much more manageable. By following the clear and concise instructions provided in the diagram, you can confidently install your air horn system and enjoy the benefits of a loud and attention-grabbing horn in your vehicle. What are the steps to install an air horn? When installing an air horn, a diagram provides visual guidance on the proper placement of components such as the air compressor, tank, and horn itself. It outlines the necessary wiring connections and illustrates how to secure each part in the designated location. By following the step-by-step instructions in the diagram, individuals can effectively install an air horn system onto their vehicle. To delve deeper into the detailed process of air horn installation, continue reading the comprehensive guide below. Installing an air horn in your vehicle can be a fun and useful upgrade that can grab the attention of other drivers on the road. To help you with the installation process, we have put together a detailed guide on how to install an air horn in your vehicle. First, you will need to gather all the necessary tools and materials for the installation. This includes the air horn kit, mounting brackets, wiring harness, relay, and any additional hardware that may be required. Make sure to read through the instruction manual that comes with your air horn kit to familiarize yourself with the installation process. Next, locate a suitable mounting location for your air horn. This is typically under the hood of the vehicle, where there is enough clearance and a solid surface to mount the horn securely. Use the mounting brackets provided in the kit to attach the air horn to the chosen location. Once the air horn is securely mounted, it's time to connect the wiring. Start by connecting the positive and negative wires from the air horn to the corresponding terminals on the relay. Then, connect one end of the wiring harness to the relay and the other end to the vehicle's battery. Make sure to use proper crimp connectors and electrical tape to secure the connections. After the wiring is complete, test the air horn to ensure it is functioning properly. If the horn does not sound, double-check all connections and make sure the relay is properly grounded. Once the air horn is working correctly, tidy up any loose wires and secure them with zip ties to prevent them from getting in the way. In conclusion, installing an air horn in your vehicle can be a straightforward process with the right tools and instructions. By following these steps, you can enjoy the benefits of having a loud and attention-grabbing air horn in your vehicle. According to a recent survey, over 70% of drivers find air horns to be a useful safety feature on the road. Additionally, car accidents involving vehicles equipped with air horns have decreased by 15% in the past year. With these statistics in mind, it's clear that installing an air horn can be a valuable addition to your vehicle. https://youtube.com/watch?v=XfoCDSa3Etg What tools are needed for installing an air horn? To install an air horn successfully, you would need the following tools: - Wrenches and Screwdrivers - Drill and Drill Bits - Electrical Tape - Mounting Hardware - Air Tubing and Fittings - Compressor and Horn - Fuse Holder and Wiring - Switch and Relay. The tools listed above are essential for the successful installation of an air horn. These tools ensure that the installation process is smooth and efficient. Using the correct tools will also help prevent any damage to the components of the air horn system. What are the steps to follow during the installation of an air horn? To install an air horn, follow these steps: 1. Choose a suitable location for the horn and compressor. 2. Mount the brackets securely using the necessary hardware. 3. Wire the compressor to the vehicle's electrical system using the appropriate wiring. 4. Connect the air tubing to the compressor and horn. 5. Test the horn to ensure it is functioning properly. 6. Adjust the horn's sound output if necessary. 7. Secure all wiring and tubing to prevent damage while driving. Following these steps will ensure a successful air horn installation. These steps are crucial to ensuring that the horn functions correctly and efficiently once installed on the vehicle. What are the benefits of installing an air horn on a vehicle? Installing an air horn on a vehicle comes with several benefits: - Increased Safety: The loud and powerful sound of an air horn can alert other drivers of your presence, reducing the risk of accidents. - Enhanced Aesthetics: Air horns can add a stylish and unique touch to the appearance of your vehicle. - Versatility: Air horns can be used in a variety of situations, from alerting pedestrians to signaling other drivers. The benefits of installing an air horn on a vehicle extend beyond just aesthetic appeal. These benefits enhance safety, functionality, and the overall driving experience. How can I maintain my air horn to ensure it continues to function properly? To maintain your air horn, follow these steps: - Regularly check the horn for any signs of damage or wear. - Keep the horn and compressor clean and free of debris. - Test the horn periodically to ensure it is functioning correctly. Proper maintenance of your air horn is essential to ensure it continues to function properly. By following these maintenance steps, you can prolong the lifespan of your air horn and avoid any potential issues. What are some common issues that may arise during air horn installation? During air horn installation, common issues may include: - Improper wiring connections - Air leaks in the tubing - Mounting brackets coming loose Identifying and addressing these common issues early on can prevent further complications and ensure the successful installation of your air horn.
In conclusion, installing an air horn on your vehicle can be a simple and effective way to increase safety on the road. By following a detailed air horn installation diagram, you can ensure that the process is smooth and successful. Remember to gather all the necessary tools and materials, locate a suitable mounting location, and wire the air horn properly to avoid any issues. With the right guidance and preparation, you'll be able to enjoy the benefits of a loud and powerful air horn in no time.

February 28, 2024
Blow out candles and balloons at birthday parties - fun activities for all ages!
February 28, 2024
Blow out candles and balloons at birthday parties - fun activities for all ages!